Main Navigation

Congrats on your purchase of the new Moppet child avatar!
We have created a step-by-step walkthrough for you to get your Moppet Avatar working for you!
Start by rezzing the box in your inventory called “Moppet Kid Body” or “Moppet Baby Body” (depending upon which size you chose).
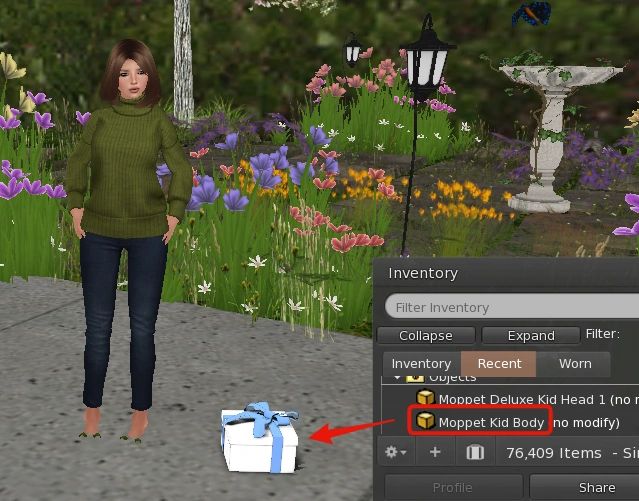
Touch the package to unpack to your inventory
Look for a folder called “Moppet Body in this folder” in your inventory. (you will find it under the “recent” tab).

Open the folder. Inside you will see a notecard called “Moppet notes – PLEASE READ” . Please read this notecard before wearing your avatar.

Reset your avatar by removing ALL mesh items you are currently wearing and relog.
Otherwise you risk looking like an alien with bugeyes and could corrupt your shape. A quicker, but less reliable option is to remove all mesh go to Avatar > Avatar health > undeform avatar before putting on your Moppet Body.
When returning to Second Life, open your inventory and find the “Moppet Body in this folder”. Right click the folder and choose replace current outfit. Within seconds you will be wearing your new avatar!

How do you like your new sweatsuit?
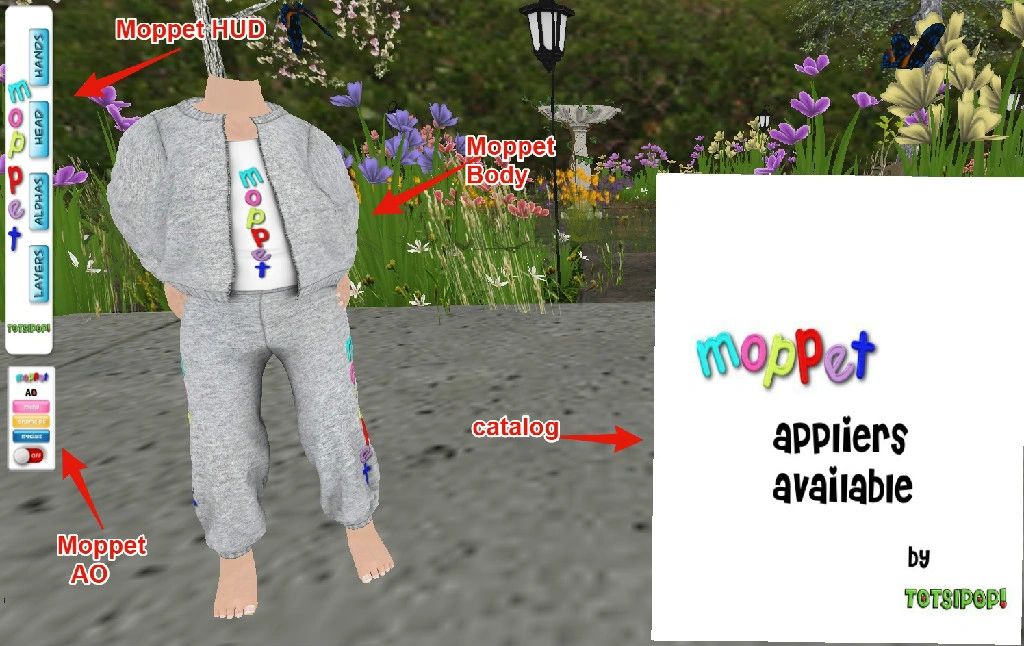
On your screen, you will see a few HUDs. In the center there is a catalog of all the available accessories for Moppet in case you want to shop. To look at the catalog, just click on each page and look.
After perusing the products in the Moppet Catalog, right click it and choose detach. It will stay in your folder for later.
On the left side of your screen, you will see the Moppet HUD. This is the heart of the avatar – you will use it often!
Although it is pretty user friendly, I will go over some of its features with you (there are more detailed instructions here):
Under the “Hands” Tab
To change your Moppet’s hand position, click on one you like

To change your Moppet’s finger or toenail polish, click on one you like
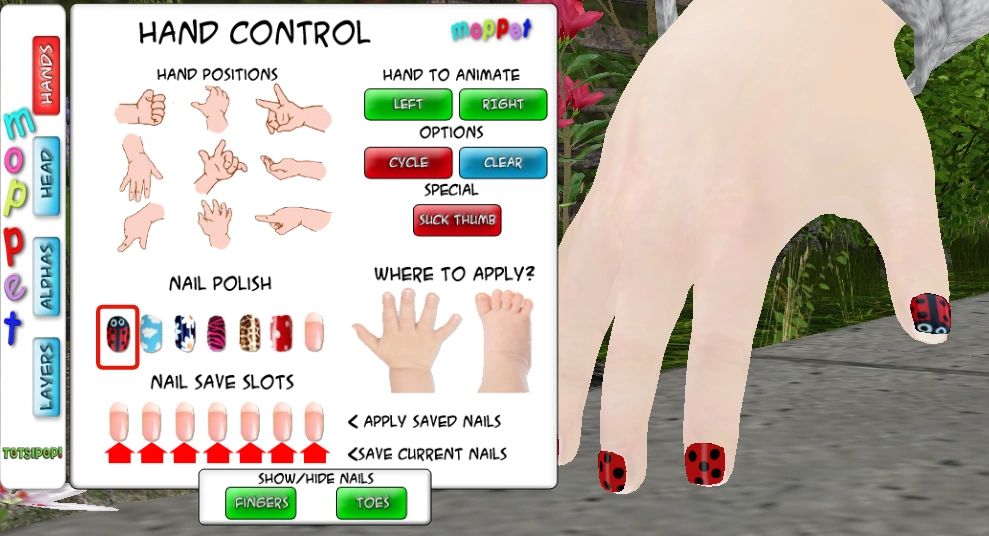
You can also hide your finger and toenails by tapping the buttons on the bottom of the tab
Under the “Alphas” Tab
Use this tab to make parts of your mesh body and head transparent.

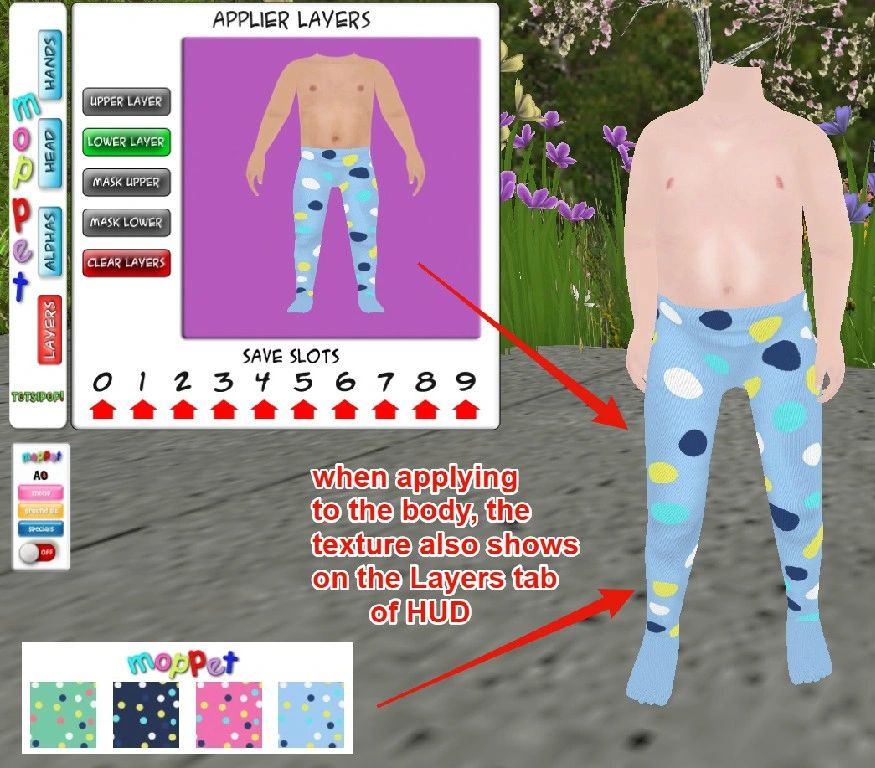
Under the “Layers” Tab
Here you will see the tattoo’s you are wearing on the paper doll. To turn the tattoos you have applied on or off, click on the “upper layer” or “lower layer” buttons. To remove the tattoo altogether, click on the “clear layers” button.
Unless you’d like to walk around Second Life with no head, we will need to wear your new Moppet Head!
As you did with the Moppet Body, rez the Moppet Deluxe Head Box you received upon purchase, touch the box, and then look under your Recent Tab to find the folder in your Inventory called “Moppet Deluxe Kid Head in this folder”… Once you have found it, right click and choose “add” (NOT replace!)

On the top of the screen, you will see two HUDs – Freckles and Blush. To add these options to your avatars face, simply click on the button you like and it will appear on your Moppet’s face. Because you can only apply one tattoo at a time, there is a freckle option that also has blush.

Now that we have a head on, we can take a closer look at the Head tab of the Moppet HUD!
Under the “Head” Tab
Choose from several basic facial expressions or make your own by using the arrows to scroll through eye expressions and then mouth expressions. Be sure to tap the “apply” button so it shows on your Moppet! Your choices can be saved by using the red arrows.

Choose an eye color that matches your mood by tapping on the options. To wear your own mesh eyes, turn the Moppet eyes off by tapping the bottom left button.

Decide how many teeth you want to have by tapping on the mouth that looks right to you.

Now you may have noticed that the skin of your new Moppet Avatar is kind of… well… boring. This is because we know you will be changing things up as you create your own look with the adorable Moppet Skins available. These skins are all unisex and can be made boyish or girlish using freckles, blush, clothing and hair.
To wear a Moppet Skin, just double click the applier in your inventory, click on the box bottom right of your screen and watch your skin appear on your Moppet! Because mesh is tricky in some environments, we recommend that you use the Nam’s Optimal Skin and Prim Windlight. To change your windlight, go to world > environment editor > choose customize my environment > choose fixed sky and use the drop down menu to settle on Nam’s Optimal Skin and Prim.
The Moppet is also Omega enabled so that you can wear any skin that can be applied using the Omega applier system.
Have fun reliving your childhood!
TheTOTSI Moppet Team
We have created a step-by-step walkthrough for you to get your Moppet Avatar working for you!
Start by rezzing the box in your inventory called “Moppet Kid Body” or “Moppet Baby Body” (depending upon which size you chose).

Touch the package to unpack to your inventory
Look for a folder called “Moppet Body in this folder” in your inventory. (you will find it under the “recent” tab).

Open the folder. Inside you will see a notecard called “Moppet notes – PLEASE READ” . Please read this notecard before wearing your avatar.

Reset your avatar by removing ALL mesh items you are currently wearing and relog.
Otherwise you risk looking like an alien with bugeyes and could corrupt your shape. A quicker, but less reliable option is to remove all mesh go to Avatar > Avatar health > undeform avatar before putting on your Moppet Body.
When returning to Second Life, open your inventory and find the “Moppet Body in this folder”. Right click the folder and choose replace current outfit. Within seconds you will be wearing your new avatar!

How do you like your new sweatsuit?
On your screen, you will see a few HUDs. In the center there is a catalog of all the available accessories for Moppet in case you want to shop. To look at the catalog, just click on each page and look.

After perusing the products in the Moppet Catalog, right click it and choose detach. It will stay in your folder for later.
On the left side of your screen, you will see the Moppet HUD. This is the heart of the avatar – you will use it often!
Although it is pretty user friendly, I will go over some of its features with you (there are more detailed instructions here):
Under the “Hands” Tab
To change your Moppet’s hand position, click on one you like

To change your Moppet’s finger or toenail polish, click on one you like

You can also hide your finger and toenails by tapping the buttons on the bottom of the tab
Under the “Alphas” Tab
Use this tab to make parts of your mesh body and head transparent.

Under the “Layers” Tab
Here you will see the tattoo’s you are wearing on the paper doll. To turn the tattoos you have applied on or off, click on the “upper layer” or “lower layer” buttons. To remove the tattoo altogether, click on the “clear layers” button.

Unless you’d like to walk around Second Life with no head, we will need to wear your new Moppet Head!
As you did with the Moppet Body, rez the Moppet Deluxe Head Box you received upon purchase, touch the box, and then look under your Recent Tab to find the folder in your Inventory called “Moppet Deluxe Kid Head in this folder”… Once you have found it, right click and choose “add” (NOT replace!)

On the top of the screen, you will see two HUDs – Freckles and Blush. To add these options to your avatars face, simply click on the button you like and it will appear on your Moppet’s face. Because you can only apply one tattoo at a time, there is a freckle option that also has blush.

Now that we have a head on, we can take a closer look at the Head tab of the Moppet HUD!
Under the “Head” Tab
Choose from several basic facial expressions or make your own by using the arrows to scroll through eye expressions and then mouth expressions. Be sure to tap the “apply” button so it shows on your Moppet! Your choices can be saved by using the red arrows.

Choose an eye color that matches your mood by tapping on the options. To wear your own mesh eyes, turn the Moppet eyes off by tapping the bottom left button.

Decide how many teeth you want to have by tapping on the mouth that looks right to you.

Now you may have noticed that the skin of your new Moppet Avatar is kind of… well… boring. This is because we know you will be changing things up as you create your own look with the adorable Moppet Skins available. These skins are all unisex and can be made boyish or girlish using freckles, blush, clothing and hair.
To wear a Moppet Skin, just double click the applier in your inventory, click on the box bottom right of your screen and watch your skin appear on your Moppet! Because mesh is tricky in some environments, we recommend that you use the Nam’s Optimal Skin and Prim Windlight. To change your windlight, go to world > environment editor > choose customize my environment > choose fixed sky and use the drop down menu to settle on Nam’s Optimal Skin and Prim.
The Moppet is also Omega enabled so that you can wear any skin that can be applied using the Omega applier system.
Have fun reliving your childhood!
The